Bacon Wrapped Turkey

Bacon + Turkey = Easy & Juicy!

Bacon + Turkey = Easy & Juicy!

That’s right, I said it: Bacon Wrapped Turkey. Bacon makes everything better – including Thanksgiving. In-laws driving you crazy? Can’t keep the kids calm while you’re slaving in the kitchen? 49ers getting beat by the Hawks? Turkey getting dry? All of this can be solved by one magical animal I call “bacon”. Wrapping a turkey in bacon for most of the cooking time keeps the turkey moist and delicious. And since the bacon is removed for the last hour of cooking, you can enjoy the bacon earlier to solve all those in-law, upset kiddo, 49ers loosing blues.

Bacon wrapped, juicy, easy, fool-proof turkey!

Bacon wrapped, juicy, easy, fool-proof turkey!

Bacon Wrapped Turkey

I don’t now why this isn’t a common turkey roasting concept. Wrapping a turkey in bacon allows fat and flavor to slowly drizzle into the turkey meat for most of of the roasting period. It’s a hassle-free way of keeping your turkey flavored and juicy.

Brining ingredients
2 cans Guinness (or any dark beer)
Brining seasoning (I bought pre-made Williams Sonoma)
2 tbs butter

Turkey ingredients
Turkey (see below for lbs and cooking time)
1 onion
1 lemon
Head of garlic
Stuffing (optional)
1 lb bacon

For turkey purchasing, I recommend buying a refrigerated, NOT frozen, turkey. Only because I’m too impatient lazy smart to buy a frozen one and defrost it for days. There are a lot of labels on a turkey – range free, no antibiotics, etc. The only one that you should ignore is gluten free – they are all gluten free. The other labels you can buy per your preferences (no antibiotics, vegetarian fed, etc).

DSC_0030

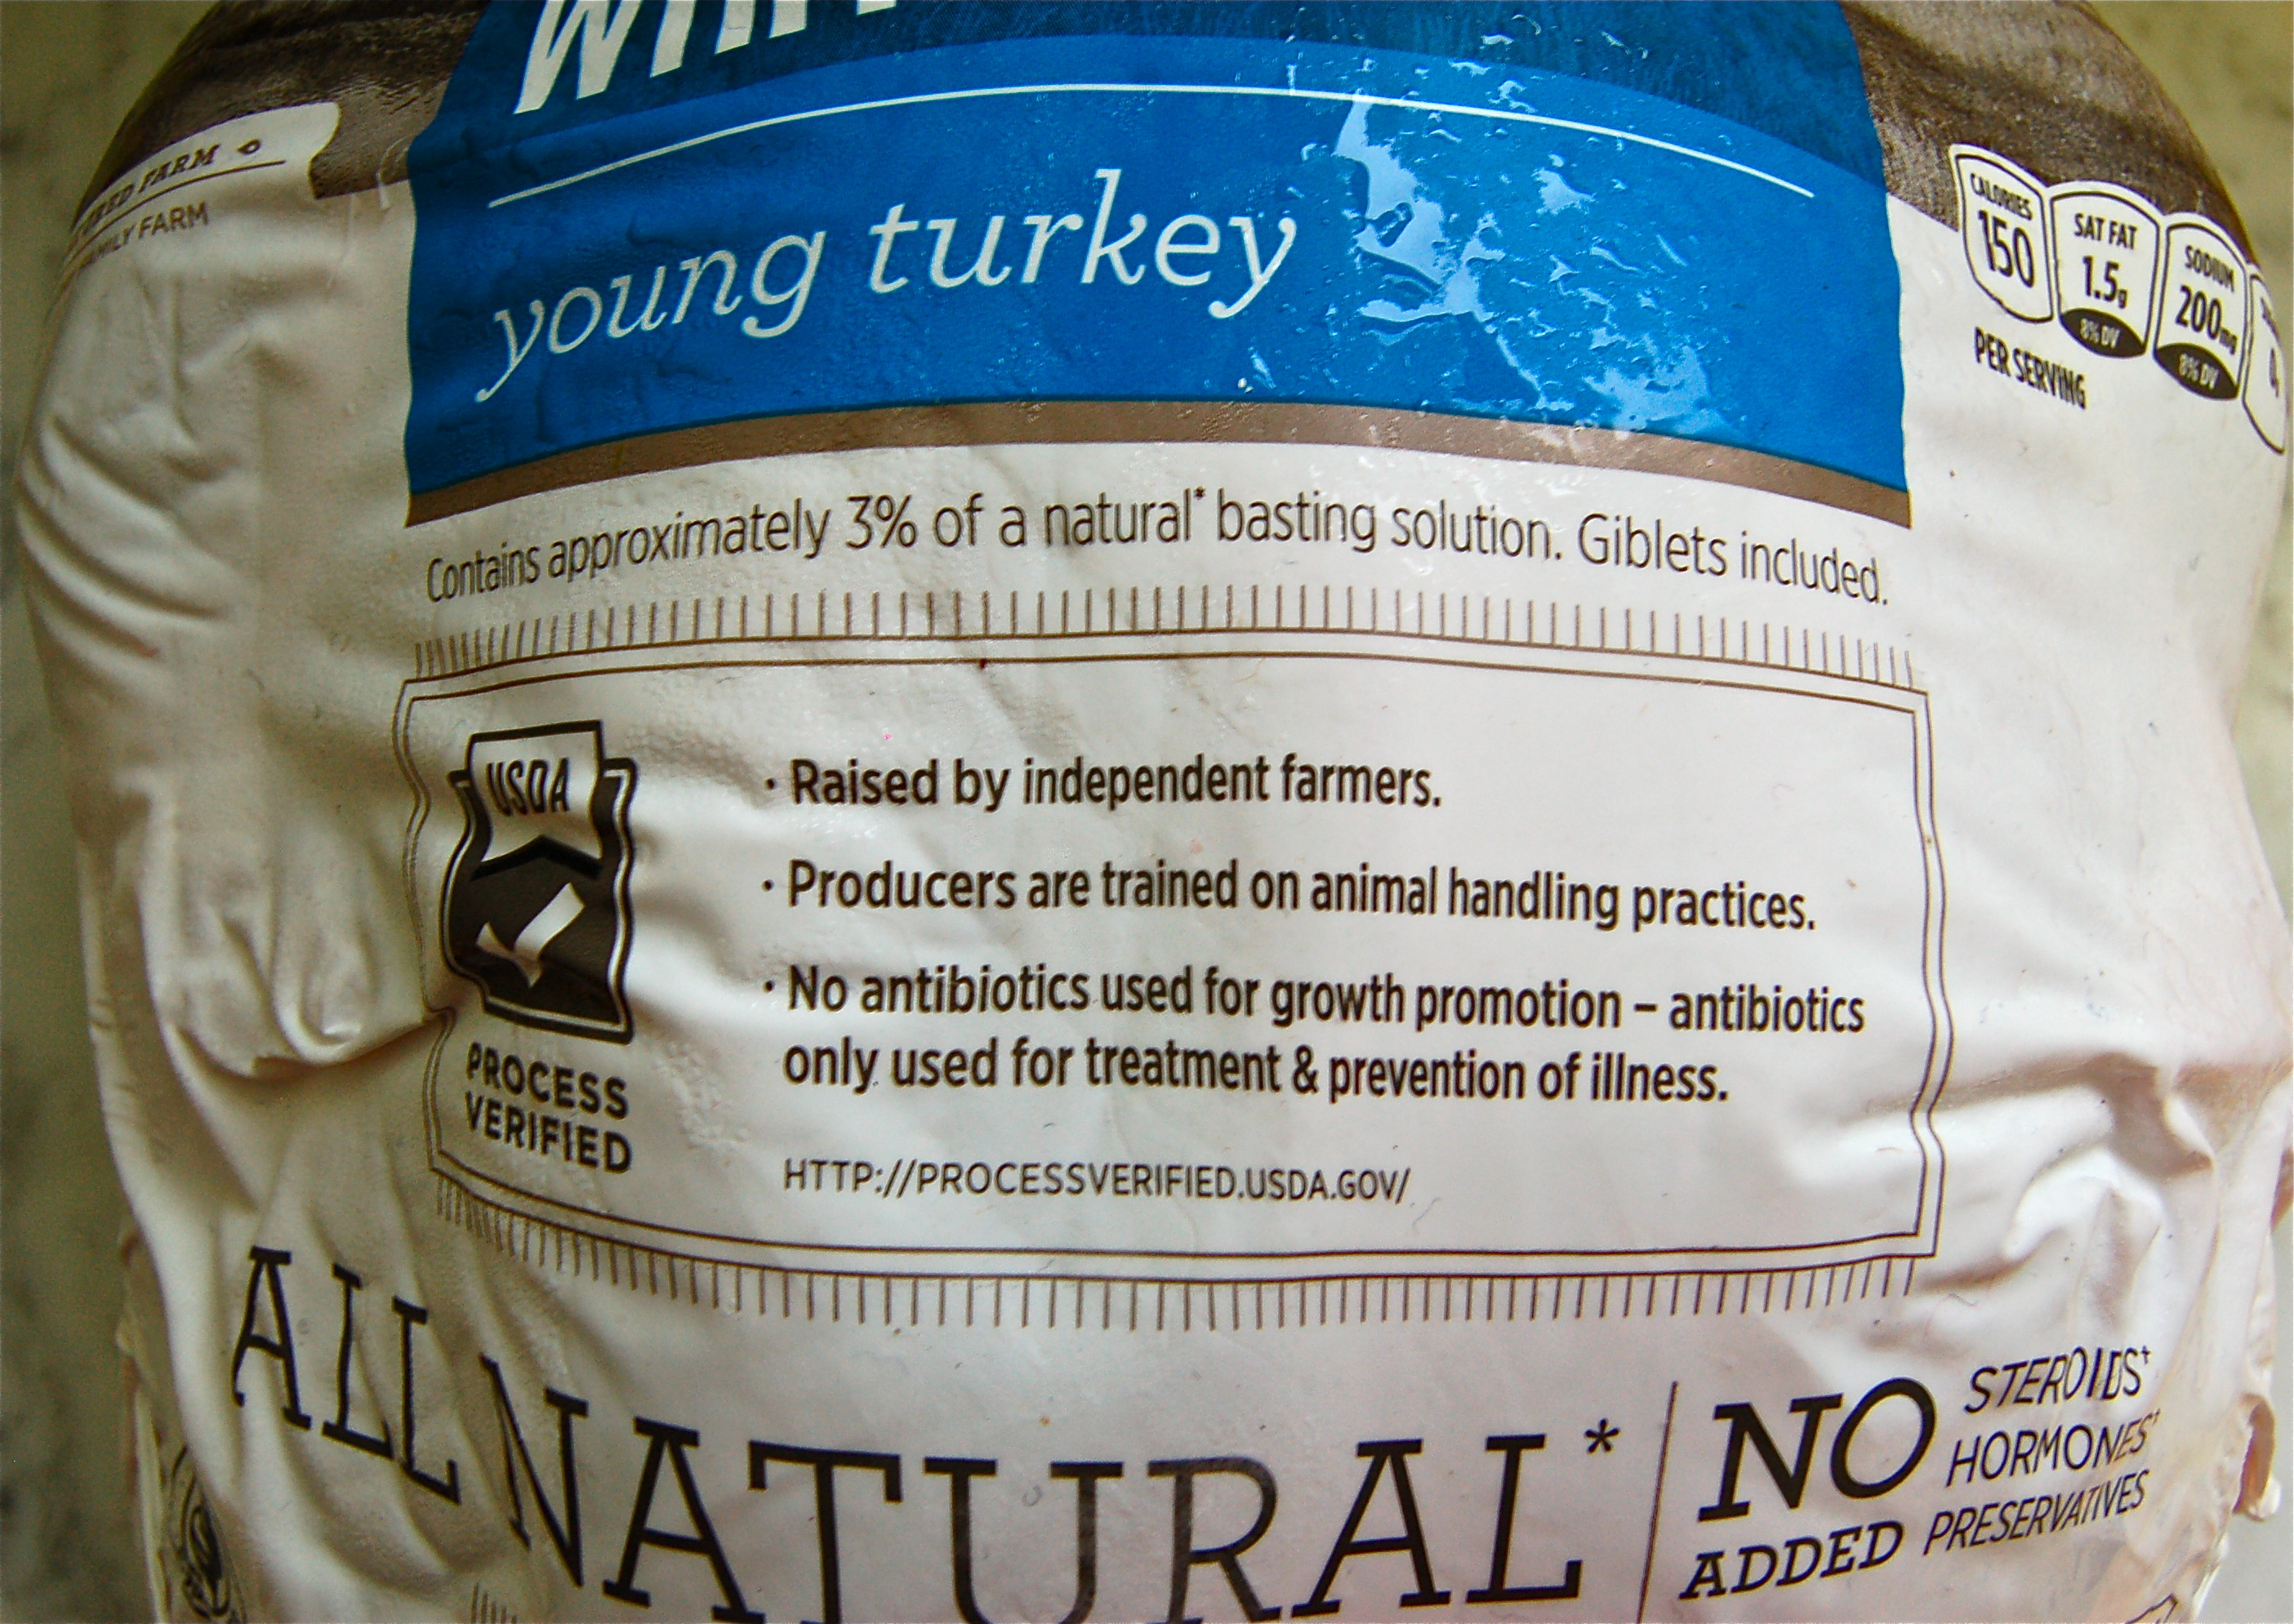
Lots of labels to read, but the one you can ignore is gluten free. If your turkey has gluten, it has problems. Turkey is, by nature, gluten free

To prep the turkey, remove any plastic-y looking things holding the legs together. Remove the bag that’s hidden inside under the neck. This bag holds the giblets & neck. These items can be brined and roasted right along with the turkey then reserved later for stock or gravy.

DSC_0034

Removing bag of giblets & neck before roasting

DSC_0045

Giblets and neck can be used for stock or gravy later. I throw all of this in with brine & roast with turkey to be used at a later time

Brining takes overnight to one day to be effective. If you don’t have enough time to brine, season your turkey with salt, pepper, thyme, parsley, sage, and rub skin (including under the breast skin) with butter or olive oil. If brining, rub butter over skin, under breast skin and place in a large brining bag. Add brining seasoning and the beer. At this point you can add water to cover the turkey, but this makes turkey + water = super heavy. Filling it with water allows all seasoning to cover turkey so there is no need to flip. I don’t add the water and flip every 6 hours. Keep refrigerated overnight to 24 hours.

DSC_0047

Happy, brining turkey ready for the overnight flavor-inducing refrigeration

On cooking day, preheat oven to 325 degrees, drain turkey and place on a roasting rack. Stuff cavity of turkey with onion, garlic, lemons and, optionally, stuffing (I used Stove Top). Tie legs together with cooking twine. COVER IN BACON and celebrate a little inside. And now, for some bacon photos.

Bacon + Turkey = Easy & Juicy!

Bacon + Turkey = Easy & Juicy!

DSC_0054

Bacon Art

Roast turkey with bacon, basting with drippings from the bottom of the pan every 45 minutes. Roast with bacon until the last hour of roasting. You remove the bacon because it’s fulfilled its usefulness and to make sure you get a beautiful, crispy, brown skin.

DSC_0063

Halfway through roasting

DSC_0064

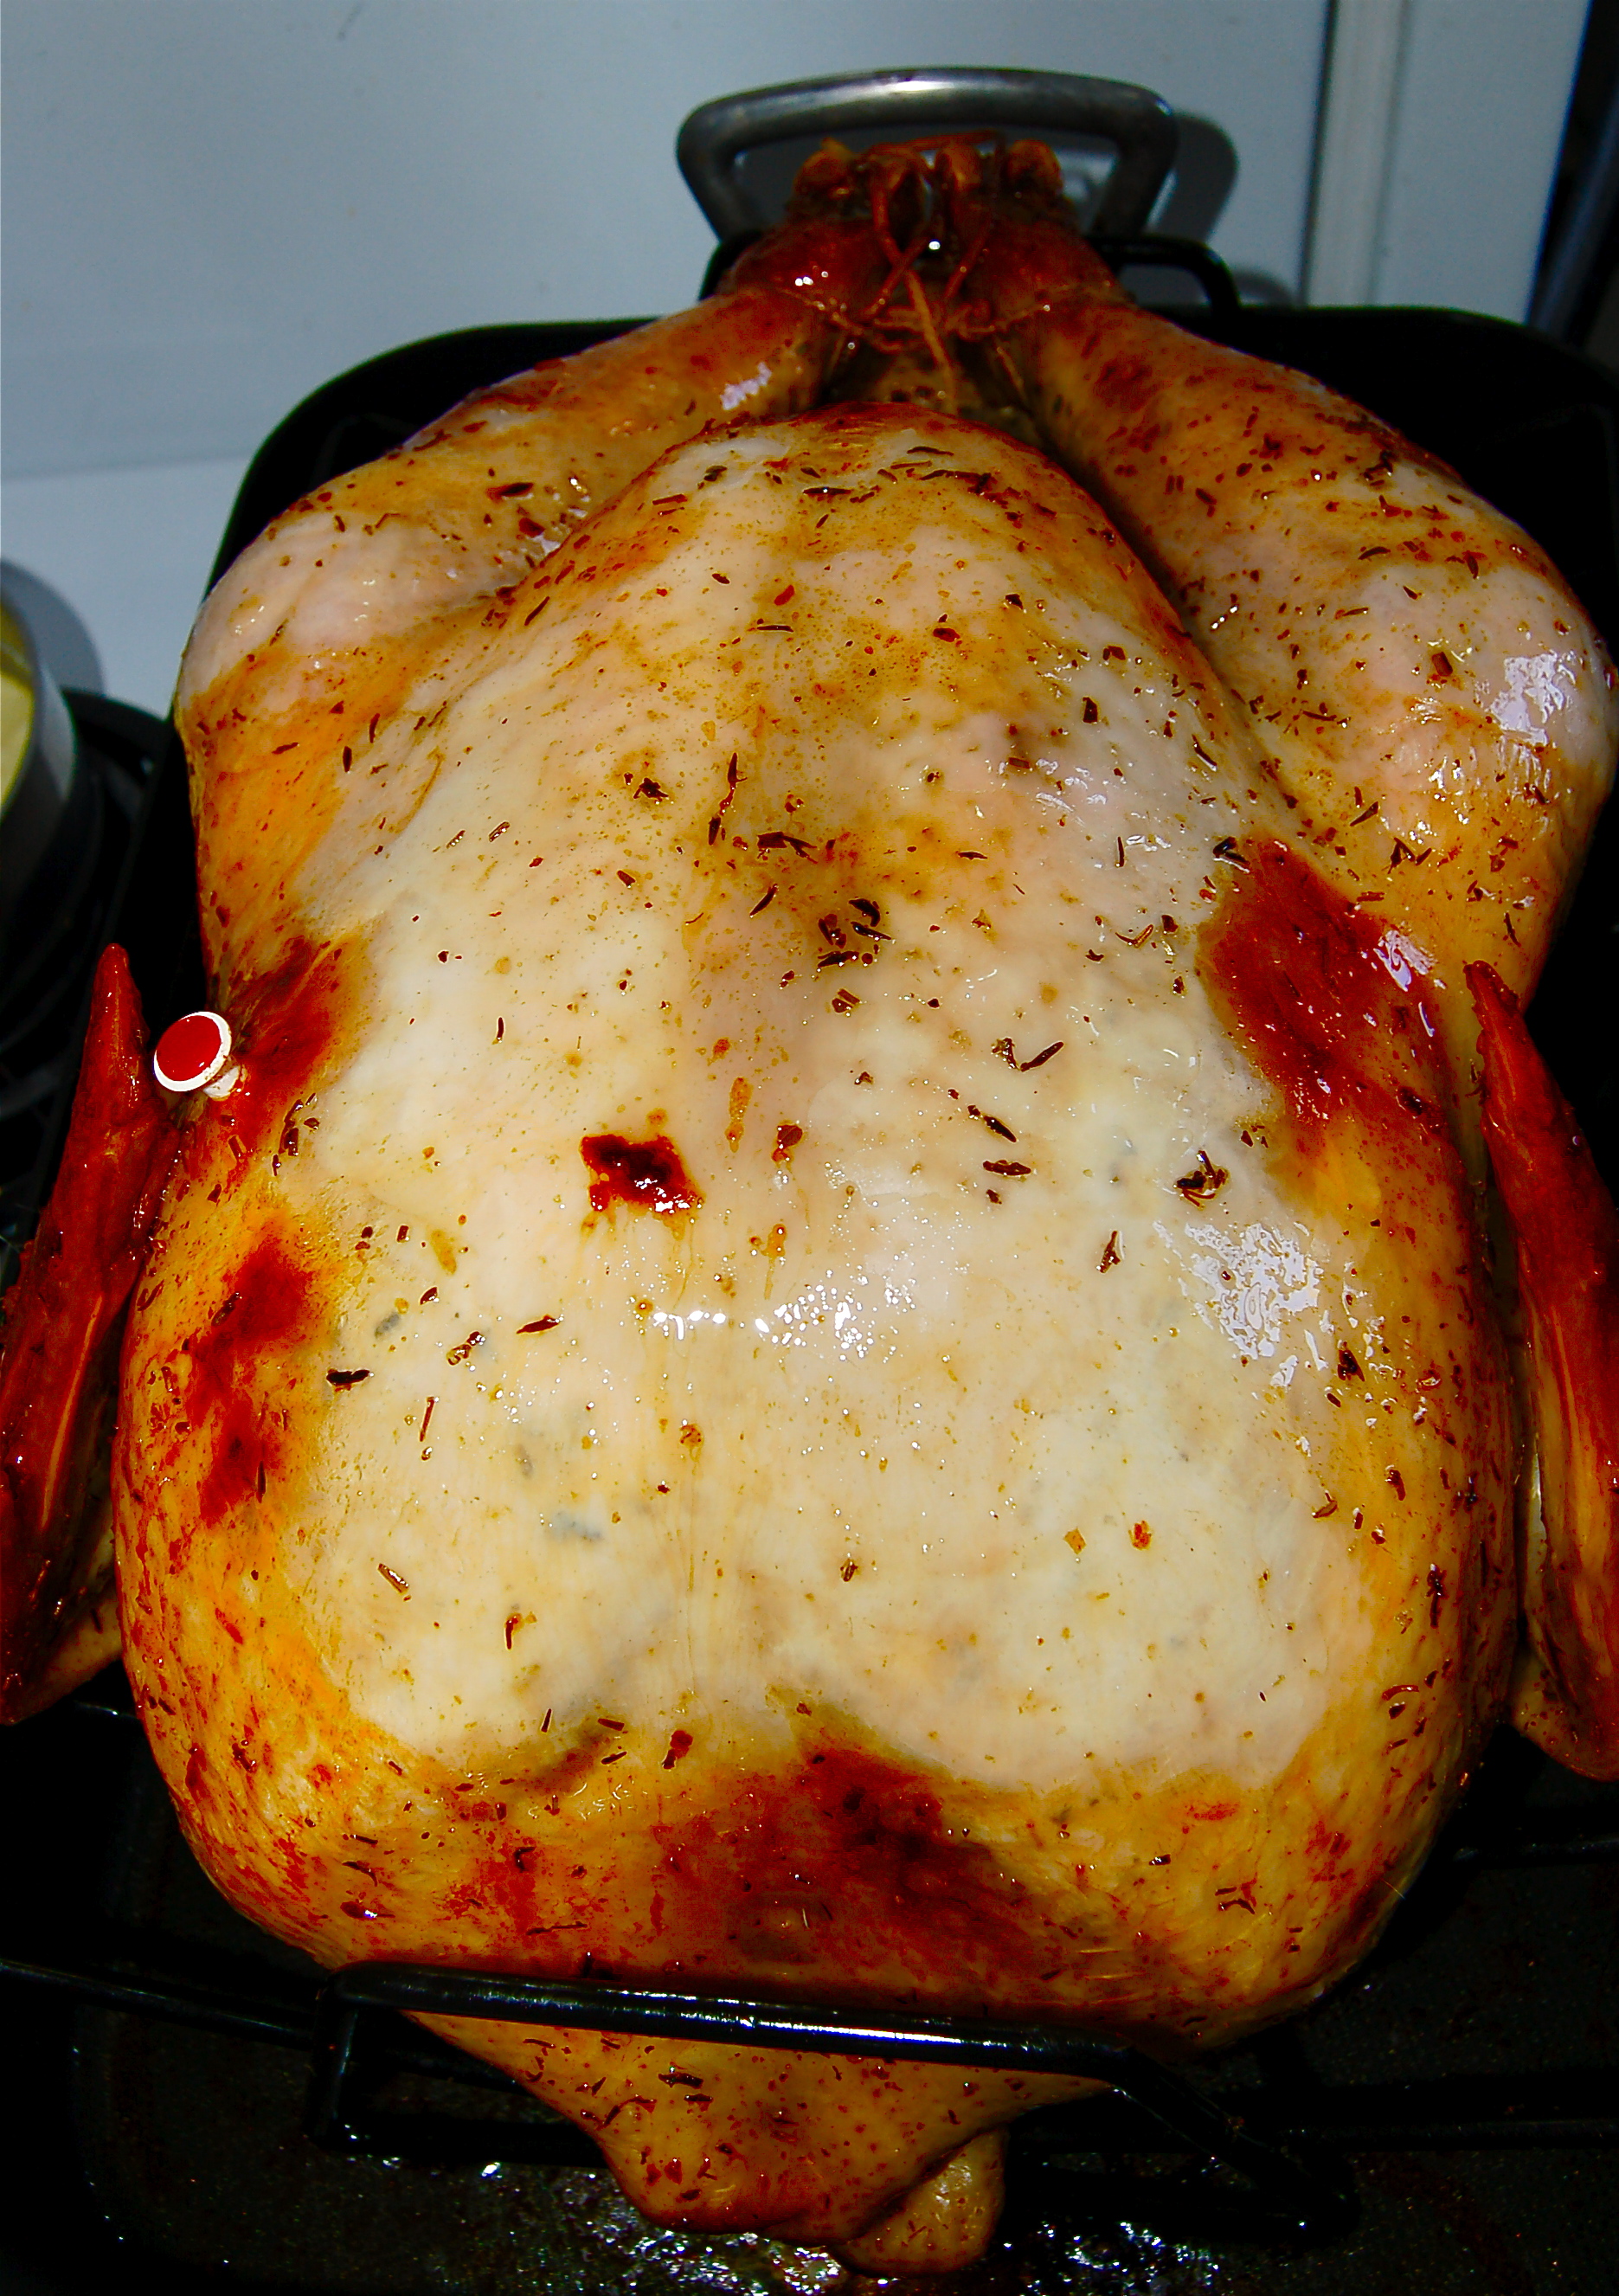
When bacon is removed, turkey will look like it’s been in a tanning bed too long with a one-peice swimsuit on

Bacon wrapped, juicy, easy, fool-proof turkey!

Bacon wrapped, juicy, easy, fool-proof turkey!

Cooking times are based on lbs of turkey and are as follows:

8-12 lbs     3 – 3 1/2 hours
13-14 lbs   3 1/2 – 4 hours
15-18 lbs   4 – 4 1/2 hours
19-20 lbs  4 1/2 – 4 3/4 hours
21-24 lbs   4 3/4 – 5 hours

Cook until a internal temperature of thigh is about 160 degrees. Remove from oven and rest, covered in aluminum foil for 30 minutes. The temperature will raise slightly higher as it rests. Now have your favorite guest carve the turkey and serve! Don’t forget to set the table pretty, eat some crispy bacon, and enjoy all those happy, smiling, turkey eating guests of yours. Happy Thanksgiving everyone!

Processed with Moldiv

IMG_9676

Cheers to bacon wrapped turkey!


Adobo Chicken Tortilla Soup

Adobo Chicken Tortilla Soup: Yummy, Filling, Crowd-Pleasing, and oh-so-easy. Plate by Crow Canyon Home

Adobo Chicken Tortilla Soup: Yummy, Filling, Crowd-Pleasing, and oh-so-easy. Plate by Crow Canyon Home

Happy almost-right-before-Thanksgiving Day! For those of you who might be throwing Thanksgiving or having family visitors, you’re dealing with a dilemma. You’re focused on all the Turkey Day cooking and, OHCRAP, you have people to feed even before that big cooking day comes! Never mind that you’re planning Thanksgiving for your vegetarian/omnivore/gluten-free/lactose intolerant/low fat/paleo/frutarian/dessertarian friends, you ALSO have to think about how to feed them in the days BEFORE Thanksgiving! What to do!? 

Not to worry – I’ve created an easy, crowd pleasing, low-maintenance, and delicious soup that’s easy to modify to different dietary needs. It’s also a complete meal that doesn’t take up much high-valued real estate in your fridge, can be pre-made and reheated in a snap. What more could you ask for in a pre-Thanksgiving, in-law feeding meal?! Excited? Me too…on to the recipe!

Main ingredients for Chicken Adobo Tortilla Soup

Main ingredients for Chicken Adobo Tortilla Soup

Adobo Chicken Tortilla Soup

This recipe is an easy and delicious soup recipe that is a complete meal on its own and can be modified to dietary needs. Below I’ve flexed my Finance talents to create a chart for dietary adjustments and included instructions on how to roast your own chicken.

You can pick any version of the recipe depending on your family’s dietary needs. You can also opt to leave certain ingredients out and allow people to add at the end. For example, I’m Paleo, so I left out the corn and beans and left a little bowl of them for my family to add later. The directions below have steps that are coded by which version you use (E) Easy, (P) Paleo/Gluten Free, (V) Vegegarian, (A) All. It sounds complicated, but it’s not! Pick a letter and just focus on ingredients and steps with that letter. It’s sort of like a nerdy “Choose Your Own Adventure” cooking lesson.
Screen Shot 2014-11-24 at 10.07.23 AM
See above photo for adobo sauce. Find it in the Hispanic cooking section of your grocery store. It can be found in a can by itself, but you’re looking for the chipotle peppers that are in adobo sauce. 
DSC_0033Roasting Chicken (A)
Pre-heat oven to 350 degrees.

Roasting chicken is relatively easy and incredibly tasty. First start by washing the chicken, removing giblets (if there are any, they’re inside the cavity) and wash/pat dry.  Separate the breast skin from the chicken using your hands to gently remove without breaking skin. WASH HANDS.

Separate the breast from the chicken using your fingers. Do this so you can put sauces & seasoning directly on the breast. It keeps it moist and gives it extra flavor.

Separate the breast from the chicken using your fingers. Do this so you can put sauces & seasoning directly on the breast. It keeps it moist and gives it extra flavor.

Zest limes, set aside. Mix together juice of two limes and adobo sauce. Salt & Pepper & olive oil inside and outside of chicken generously. Rub chicken with lime/adobo sauce and make sure to also get it under the breast skin. Stuff cavity with onion and the limes.  Sprinkle chicken with lime zest. WASH HANDS. Tie chicken legs together with cooking twine. WASH HANDS.

Rubbed, stuffed, and ready to roast!

Rubbed, stuffed, tied up, and ready to roast!

Place chicken on a roasting rack and roast in 350 degrees breast down (see photo) for about 45 minutes. WASH HANDS. The reason you start breast down is to let all those juices and flavors to melt down into the breast.

Chicken breast down

Chicken breast down

Increase heat to 400 degrees, flip chicken to breast up (see photo) drizzle additional olive oil on chicken (WASH HANDS!), and roast for another 30 minutes or until you pierce the leg and juices come out clear. The reason you end at a higher temp and breast up is to get that pretty crust on the top of the chicken.

Breasts up!

Breasts up!

Deglaze the pan with either wine (P) or beer (E, V, A). Deglazing just means adding the alcohol to the bottom of the pan. It will boil up and you can scrape up the bits of cooked chicken off the bottom of the pan. Place this juice in a separate container, cool, skim off fat. This juice is delicious and full of flavor. We’ll add it to the soup later.

Set aside chicken to cool slightly, then shred chicken meat with your hands.  Easy!

Prep Pre-Made Chicken (E, P)
Mix together adobo, juice of two limes, adobo sauce, mix in with shredded chicken, add salt & pepper to taste.

Roast tomatillos (V, A)
Roast butternut squash (P, V, A)
Instructions are the same for both roasting tomatillos and butternut squash. They can even be roasted together. Once outer layer is peeled from tomatillos and butternut squash is cubed, mix with 1 tbs olive oil, sprinkle with salt & pepper. Put in a 350 degree oven for about 15 minutes or until browned.

I'm not roasted yet!

I’m not roasted yet

DSC_0080

I’m roasty and delicious!

I'm not roasted yet

I’m not roasted yet

I'm roasty and delicious!

I’m roasty and delicious!

Prepare Soup Base (E, P, V, A)
In a large soup pot or cast iron pan, heat olive oil over medium heat. Add onion and cook until translucent, about 3 minutes. Add celery for 2 minutes, add garlic and chipotle peppers in their sauce. Cook together until onions are brown, about 3 more minutes.
DSC_0073
Deglaze Pan with beer (E, V, A)
Deglaze Pan with wine (P)
Add beer or wine, let boil while you scrape up bits of veggies from the bottom of the pan.

Deglazing with wine (P), or beer (E, V, A)

Deglazing with wine (P), or beer (E, V, A)

Add Remaining Soup Base Ingredients (E, P, V, A)
Here’s where it gets really easy. Add all remaining soup base ingredients for your selected E, P, V, A needs. Again, if you’re cooking for a certain dietary or food preference need (i.e. hates olives or doesn’t eat beans), leave those aside for people to add later. Bring everything to a boil and simmer, covered, for about 30 minutes. Soup is best the next day, so this is great for planning ahead. This soup can stay in the fridge like this for about 1 week or in the freezer for three months.

Make Avocado Spread (E, V, A) 
This soup can be spicy, so an avocado spread adds a cooling topping when you’re ready to eat the soup. Simply add avocado, zest of 1 lime, and 3 tbs of Greek yogurt in a bowl and mash together until smooth. If you have a Paleo friend or a vegetarian who doesn’t eat yogurt, you can simply top the soup with chopped avocado.
DSC_0083DSC_0089
Heat, top and serve!

Heat soup before preparation and set out tortilla chips (E, V, A), avocado spread (E, V, A) (or chopped avocado for P), shredded cheese (E, V, A), and cilantro (E, P, V, A) for topping. Sit back, relax, and enjoy a tasty, complete meal with your friends and family!

Homemade Adobo Chicken Tortilla Soup. Plate: Crow Canyon Home

Homemade Adobo Chicken Tortilla Soup. Plate: Crow Canyon Home

Special thanks to my sous chef and lighting specialist, Simon and his pup and floor warmer, Beija

Special thanks to my sous chef and lighting specialist, Simon and his pup and floor warmer, Beija